The Installation Wizard
Introduction
When you have installed ownCloud physically, you can either finalize the installation from the command line or the installation wizard. This guide focuses on using the installation wizard.
| If you are planning to use the installation wizard, we strongly encourage you to protect it through some form of password authentication or access control. If the installer is left unprotected when exposed to the internet, there is the possibility that a malicious actor could finish the installation and block you out — or worse. So please ensure that only you — or someone from your organization — can access the web installer. |
Quick Start
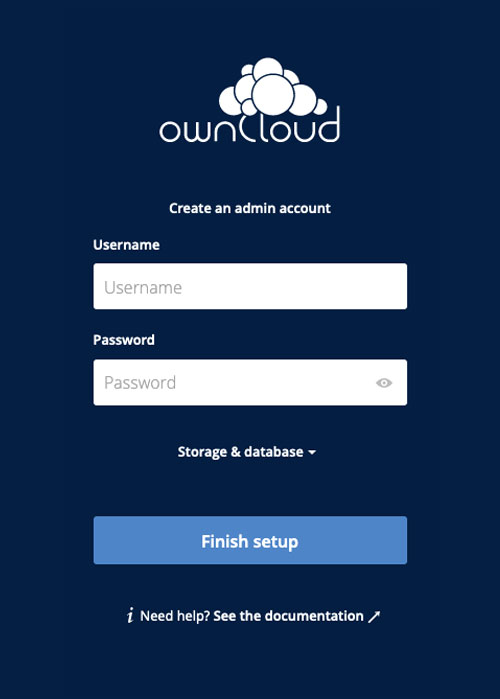
When the ownCloud prerequisites are fulfilled and all ownCloud files are installed, run the Installation Wizard. This involves just three steps:
-
Point your web browser to
http://<your-owncloud-domain>. -
Enter your desired administrator’s username and password.
-
Click Finish Setup.

Now you can start using your new ownCloud server. Of course, there is much more that you could do to set up your ownCloud server for best performance and security. In the following sections, we will cover important installation and post-installation steps.
Detailed Guide
This section provides a more detailed guide to the installation wizard and the three main topics:
Post-Installation Steps
For hardened security and proper server operation, ownCloud recommends setting the permissions on your ownCloud directories as strictly as possible. This should be done immediately after the initial installation and before running the setup.
Your HTTP user must own the directories config/, data/, apps/ and, if applicable, apps-external/ so that you can configure ownCloud, create, modify and delete your data files and install apps via the ownCloud Web interface.
You can find your HTTP user in your HTTP server configuration files, or you can use label-phpinfo. Look for the User/Group line.
-
The HTTP user and group in Debian/Ubuntu is
www-data. -
The HTTP user and group in Fedora/CentOS is
apache. -
The HTTP user and group in Arch Linux is
http. -
The HTTP user in openSUSE is
wwwrun, and the HTTP group iswww.
| When using an NFS mount for the data directory, do not change its ownership from the default. The simple act of mounting the drive will set proper permissions for ownCloud to write to the directory. Changing ownership could cause problems if the NFS mount is lost. |
An easy way to set the correct permissions is to use the scripts provided in the Script-Guided Installation.
Configuration Options
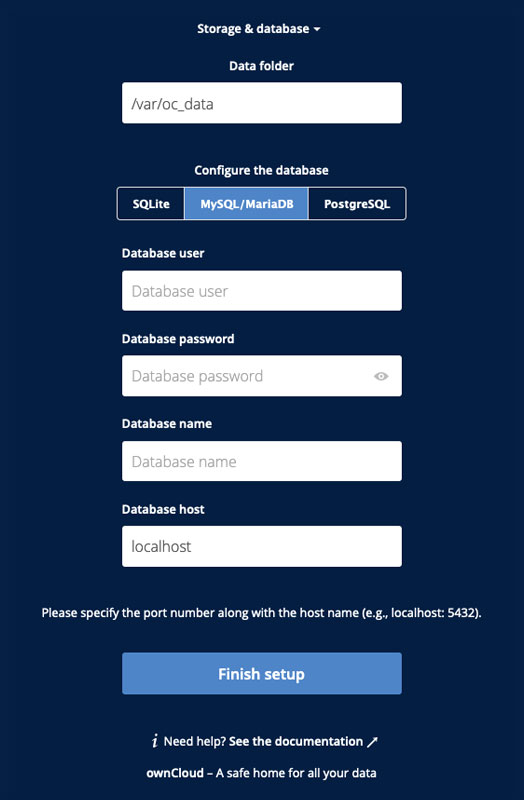
Click Storage and Database to expose additional installation configuration options for your ownCloud data directory and to select the database and configure the access.

For security reasons, the data directory of your ownCloud should be located outside the webroot of your server.
|
The location of the data directory can either be defined by entering the path here or when installing the ownCloud files. For more information on the latter, see the
Script-Guided Installation.
If you define the path here, the respective setting in your config.php file will be adjusted. Alternatively, you can create a link data pointing to the directory containing the actual files. In this case, the config.php setting for the data directory remains unchanged.
| ownCloud’s data directory must be exclusive to ownCloud and not be modified manually by any other process or user. |
It is best to configure your data directory location at installation, as it is difficult to move after installation. You may put it anywhere; in this example is it located in /var/oc_data. This directory must already exist and must be owned by your webserver user.
Database Setup by ownCloud
| Your database and PHP connectors must be installed before you run the Installation Wizard. |
After you enter your administrative login for your database, the installer creates a special database user with privileges limited to the ownCloud database.
Afterward, ownCloud only needs this special ownCloud database user and drops the administrative database login you used before. This new user’s name is based on your ownCloud admin user with an oc_ prefix and given a random password. The ownCloud database user and password are written into config.php:
For MySQL/MariaDB:
'dbuser' => 'oc_dbadmin',
'dbpassword' => 'pX65Ty5DrHQkYPE5HRsDvyFHlZZHcm',
For PostgreSQL:
'dbuser' => 'oc_postgres',
'dbpassword' => 'pX65Ty5DrHQkYPE5HRsDvyFHlZZHcm',
Click Finish setup, and you’re ready to start using your new ownCloud server.