Document Classification and Policy Enforcement
Introduction
When dealing with large amounts of data in an enterprise, it is essential to have mechanisms in place that allow you to stay in control of data flows. To implement such mechanisms the first step to take is to define guidelines that describe how the content of different security levels have to be treated.
See the following in-line YouTube video for more details or use the link to view it in a separate browser tab.
Depending on the industry, such information security guidelines can originate from regulatory requirements, from recommendations of industry associations, or they can be self-imposed if there’s no external factor but internal risk management requirements that demand special treatment for specific information.
The leading information security standard ISO 27001 defines guidelines for managing information security which can be certified. More specifically:
-
Information should enter an asset inventory (A.8.1.1)
-
Information should be classified (A.8.2.1)
-
Information should be labeled (A.8.2.2)
-
Information should be handled in a secure way (A.8.2.3)
As the leading international standard and certification for information security, ISO 27001 covers 75-80% of the GDPR. This makes it the ideal framework choice to support GDPR compliance requirements. Please see the GDPR to ISO-27001 Mapping Guide as an example to match the mentioned ISO Controls to the relevant General Data Protection Regulation (GDPR) articles.
Once the guidelines are set up, they need to be put into practice. First of all, highly sensitive data needs to be separated from less sensitive data. This is, usually, done by outlining the security levels present in the enterprise, and defining the criteria for information to qualify for each of these security levels.
Typically used security levels are "Public", "Internal", "Confidential", and "Strictly Confidential", but the requirements are usually determined individually. For example, if you are seeking GDPR compliance, then administrators can add additional ones, such as "No PID (Personally Identifiable Information)", "PID", and "Special PID".
The actual separation of information can then be done by requiring users to classify documents according to the security levels before they leave their workstation, or by using other criteria to assign classification levels to data during further processing.
Based on the classification level, information can then be labeled and policies can be enforced to ensure that information is handled in a secure way - and in compliance with corporate guidelines.
ownCloud can boost productivity with unique collaboration features. Firstly, there’s "Document Classification and Policy Enforcement". This adds the capability to ensure that sensitive data is handled as required by information security guidelines.
Specifically, it enables ownCloud providers to:
-
Comply with information security standards, such as ISO 27001/2 as recommended by the German Association of the Automotive Industry (VDA) and get certified to work securely within your value chain.
-
Handle data in compliance with GDPR
-
Manage risks effectively and cover potential data breaches.
-
Separate information based on metadata.
-
Display the data classification levels to raise user awareness.
-
Prevent human mistakes when dealing with sensitive information.
-
Fulfil corporate data protection requirements.
Classification
Employing document classification and respective policies in ownCloud generally involves three steps, which are outlined in detail below.
Tags for Classification
Document classification levels in ownCloud are represented via Collaborative Tags. Different categories of tags can be used to achieve different behaviors for users; these are detailed in the table below.
| Tag Name | Description |
|---|---|
Visible |
These tags are not available for classification based on metadata and feature policies because users can edit and delete them, which is undesirable in many cases |
Restricted |
These tags can be created by administrators using Collaborative Tags Management. This category is recommended as it enables users to recognize the classification level of files and to be able to filter accordingly. Additionally, certain groups of users can have the privilege to edit and assign or unassign these tags. |
Static |
These tags can be created by administrators using Collaborative Tags Management. This category is recommended as it enables users to recognize the classification level of files and to be able to filter accordingly. Additionally this tag category should be used for manual classification as users in specified groups can only assign and unassign them but only administrators can edit or delete them. This way administrators can provide a tag linked to a classification policy that specified users can then impose on files. |
Invisible |
These tags can be created by administrators using Collaborative Tags Management. This category is recommended when users should not be able to recognize the classification level of files or to be able to filter accordingly. |
For setting up each classification rule, create a separate tag using Collaborative Tags Management, which you can later assign to classification rules and/or policies.
Automated Classification Based on Document Metadata
Automated classification based on document metadata consists of two parts:
-
The actual classification metadata is embedded in documents using Office suite features, and also in documents using the EXIF Standard for metadata.
-
Document metadata is evaluated on file upload via the web interface and all ownCloud Clients. Automated classification in ownCloud therefore takes place on file upload. Existing files containing classification metadata currently can’t be classified subsequently, except via manual user interaction.
Office Suite Features for Document Classification
Microsoft Office can be extended with the NovaPath addon, to provide classification capabilities. Currently Microsoft Office formats (docx, dotx, xlsx, xltx, pptx, ppsx and potx) are supported LibreOffice provides an integrated classification manager (TSCP).
To use automated classification based on document metadata, install and enable the Document Classification extension. The configuration depends on the tools and the classification framework in use.
Administrators can find examples and generalized configuration instructions below.
EXIF Header Metadata
For several file types, the classification relies on the installation of exiftool. For details see below.
|
PDF and several Image formats like JPEG, PNG, HEIC support EXIF metadata. See the documentation for a full list of supported file formats of exiftool. Support for EXIF was added in version 1.5.0 of the Files Classifier app. Please note that the feature requires the installation of exiftool.
sudo apt install exiftoolBasic Examples for Classification and Policy Enforcement
Microsoft Office with Add-Ons
Microsoft Office does not provide classification capabilities out-of-the-box. To extend it, we recommend the Microsoft Azure Information Protection or NovaPath add-ons. These extensions come with easy-to-use default classification categories, and provide the flexibility to set up custom classification schemes as desired.
Let’s assume you want to use the default classification framework provided by NovaPath. In addition, let’s assume that you take the classification level for documents classified as Confidential over to ownCloud to set up a policy that prevents said documents from being accessed by users in the group "Trainees".
This is how you set up an automated classification and the access policy in ownCloud:
-
As an ownCloud administrator, navigate to . Adding a group with special privileges for the tag is optional.
-
Within "User Management", create the group "Trainees" and add some users.
-
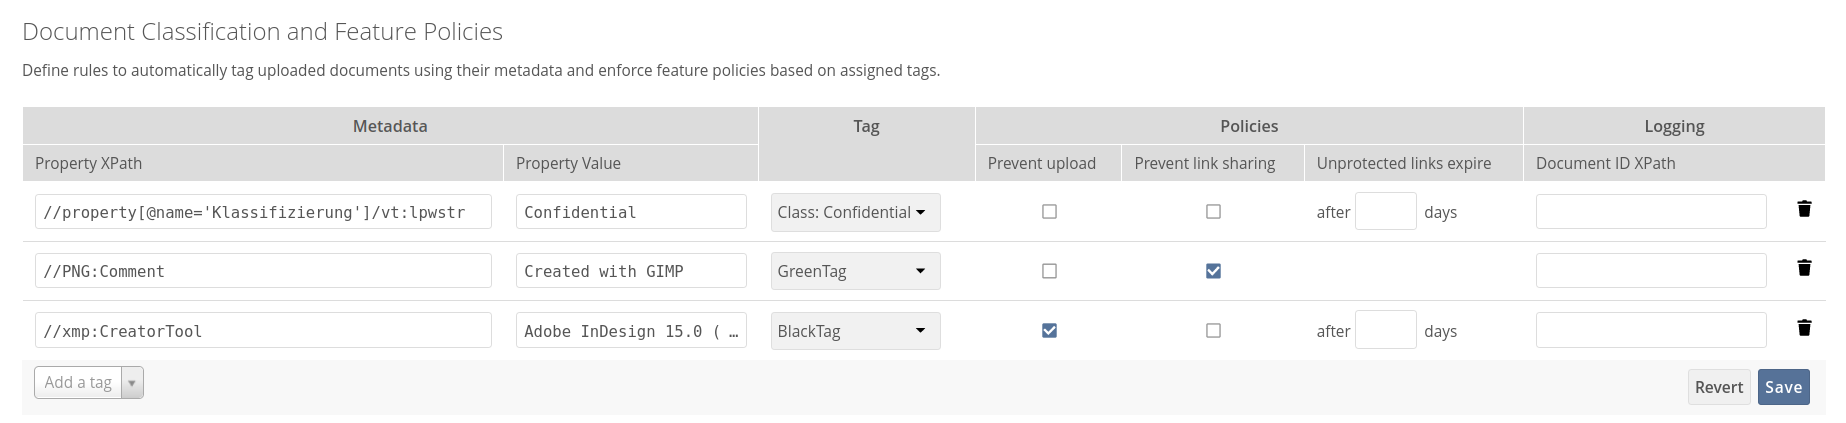
Set up the classification rule in the panel "Document Classification and Feature Policies" in the same section, and set the following two properties:
-
Property XPath = //property[@name='Klassifizierung']/vt:lpwstr
-
Property Value = Confidential
Take care, the property and value fields are case-sensitive!
-
-
For "Tag", choose Class: Confidential.
-
Don’t tick a policy checkbox as you don’t want to set up a feature policy but an access policy.
-
Hit Save.
-
Set up the access policy in .
-
In the panel "File Firewall" enter a name for the group of rules like
Confidential(optional). Hint: first click Add group if you already have other rules configured. -
From the drop-down menu, choose System file tag. In the tag picker, choose Class: Confidential. Now you should have
[System file tag] [is] [Class: Confidential]. -
To add the group restriction, click Add rule, choose User group from the drop-down menu. In the group picker drop-down, choose Trainees. Now you should have
[User group] [is] [Trainees]. -
Hit Save Rules to put the rules in place.
-
To verify that the rule is in place, upload a classified file and check for the tag. Then share it with a member of the group "Trainees" (or with the whole group) and try to access it from a user account that is a member of said group.
LibreOffice
LibreOffice implemented the open standards produced by TSCP (Transglobal Secure Collaboration Participation, Inc.):
-
The Business Authentication Framework (BAF) specifies how to describe the existing policy in a machine-readable format
-
The Business Authorization Identification and Labeling Scheme (BAILS) defines how to refer to such a BAF policy in a document
There are three default BAF categories that come with different classification levels, which can be used out-of-the-box:
-
Intellectual Property
-
National Security
-
Export Control
Assume you want to use the BAF category "Intellectual Property" and take the classification level for documents classified as "Confidential" over to ownCloud, to set up a policy that prevents said documents from being shared via a public link. This is how you set up an automated classification and the feature policy in ownCloud:
-
As an ownCloud administrator, navigate to . Adding a group with special privileges for the tag is optional.
-
Scroll down to the panel Document Classification and Feature Policies:
-
Set up the classification rule and feature policy:
-
Property XPath = //property[@name='urn:bails:IntellectualProperty:BusinessAuthorizationCategory:Name']/vt:lpwstr
-
Property Value = Confidential
(Take care, the property and value fields are case-sensitive!) -
For "Tag" choose Class: Confidential.
-
Tick the checkbox Prevent link sharing.
-
Hit Save.
-
-
To verify that the rule is in place, upload a classified file, check for the tag and try to create a public link share.
EXIF Metadata
The available elements in EXIF metadata can vary depending how the file was created.
-
Software creating PDF documents may embed their name:
Property XPath = //xmp:CreatorTool
Property Value = Adobe InDesign 15.0 (Macintosh) -
Photo cameras may embed the Product name:
Property XPath = //IFD0:Model
Property Value = Canon EOS 40D -
Screenshot or graphics software may have:
Property XPath = ///PNG:Software
Property Value = gnome-screenshotProperty XPath = //PNG:Comment
Property Value = Created with GIMP
General Approach
Apart from the concrete examples above, a generalized method to employ document classification is available below.
Find the Metadata Properties and Values
-
Classify a document in LibreOffice/MS Office and save it in an MS Office format.
-
Rename the document’s file extension to ".zip" and open it.
-
Find the file
docProps/custom.xmlin the archive and open it with a text editor. -
Within
custom.xml, find the property that contains the classification level value. -
Note down the classification property and value.
-
Repeat the steps for all classification properties and values you want to set up classification rules for in ownCloud.
Finding Metadata in PDF or Images
-
The command line tool
exiftoolcan be used to inspect a file for suitable metadata. -
The output of
exiftool -n -q -b -X example.pdfshows the metadata XML syntax. Use the XML element names to generate XPath queries and XML element data for the Property Value. -
The metadata may use XML namespaces. In
xmp:CreatorToolthe namespace isxmp. -
We can use more complex XPath expressions to match the
CreatorToollike in any namespace or by prefix:
Property XPath = //*[local-name()='Comment']
Property Value = Created with GIMPProperty XPath = //*[local-name() = 'CreatorTool']
Property XPath = //*[starts-with(local-name(), 'Creator')]
Note that other XPath selectors than local-name() or starts-with are currently not supported.
Set Up Classification Rules
-
As an ownCloud administrator, navigate to
-
In the panel Document Classification and Feature Policies set up the rules:
-
Property XPath: Enter the XPath that identifies the classification property. Below you find a generalized example where
classification-propertyis a placeholder for the property to evaluate.property[@name='classification-property']/vt:lpwstr -
Property Value: Enter the value that triggers the classification rule when it matches with the metadata of an uploaded document, e.g.,
Confidential. Take care, the property and value fields are case-sensitive. -
Tag: Choose the tag to apply to files when a match occurs.
-
-
Repeat the steps to create classification rules for all desired properties and values
Automated Classification Based on File or User Properties
Apart from automated classification based on document metadata, uploaded files may also be classified according to criteria inherent to files or to the users uploading them, making use of the Workflow extension.
-
Administrators may add rules for automated classification of files according to a file’s size or file type.
-
File uploads by specific users, devices, or source networks can be used as indicators for classification.
-
Furthermore, administrators can define shared folders to automatically classify files uploaded to such folders, by tagging the respective folder and creating a Workflow rule based on the chosen System file tag.
-
Additionally, the rules may be linked to achieving a more granular classification behavior (e.g., PDF files uploaded by a specific group of users should be classified as Confidential).
Assume you want to automatically classify all PDF documents uploaded by users that are members of the "Management" group. You can construct a workflow rule using the following steps:
-
Within user management create the group "Management" and add some users.
-
Navigate to .
-
In the Collaborative Tags Management panel, create a tag of type "Static" and call it
Class: Confidential. Adding a group with special privileges for the tag is optional. -
In the panel "Workflow" you can now set up the classification rules. Hit Add new workflow and specify a useful name. Now configure the conditions that trigger the classification once they are met. For that choose "User group" from the drop-down menu, click +, then choose "File mimetype" and click + again. Then you have to provide the group "Management" and the MIME type for PDF (
application/pdf) in the respective fields. -
Select the tag Class: Confidential to be added when the rules match.
-
Click Add workflow to save and enable it.
| For more information, please check the options available for auto-tagging and consult the Workflow Extension documentation. For files classified with the Workflow extension, administrators can impose feature and access policies as described in the next section. |
Manual Classification
As a further measure, it is possible to supply tags for users to autonomously classify all types of files in their own or shared spaces.
-
As an ownCloud administrator, create a group within user management and add the users that should be able to classify files.
-
Then navigate to .
-
In the Collaborative Tags Management panel, create a tag of type "Static" and give it a meaningful name. Then assign the group you created, in the beginning, to give its users special privileges for the tag.
-
Users that are not a member of the specified group(s) will only be able to see the respective tag but can’t alter or assign/un-assign it.
For files that are classified manually, administrators can impose feature and access policies as described in the next section.
Policy Enforcement
ownCloud currently provides two types of policies that can be enforced based on classification, Feature and Access policies. These policies can be imposed independently of the classification mechanism. The following sections illustrate the available policies and explain how they can be applied to classified contents.
Feature Policies
Feature policies are restrictions that prevent users from using a feature or force them to use it in a certain way. They are provided by the Document Classification extension, which currently supports the following policies:
Prevent Upload
To follow guidelines that prevent data of certain classification levels (e.g., "strictly confidential") from being used in ownCloud at all, the "Prevent upload" policy is the right instrument to use. To impose such policies, tick the checkbox associated with the classification rule for the respective classification level.
When trying to upload documents caught by the policy, users will get an error message: A policy prohibits uploading files classified as '<tag>', where <tag> is the tag chosen for the classification rule.
| Even though the server won’t accept the uploaded files, in the end, it is mandatory to configure a tag for the classification rule to work. |
Prevent Link Sharing
The prevent link sharing policy is tasked to ensure that classified data of certain confidentiality levels can’t be shared publicly. This way, users can collaborate on the data internally, but it can’t leave the company via ownCloud. To enable such policies, tick the checkbox associated with the classification rule for the respective classification level.
Documents with the associated classification level:
-
Can’t be shared via link (public links on single files and folders containing classified files); and
-
Can’t be moved to a publicly shared folder.
In all cases the user will see an error message containing the reasoning and the respective file(s):
The file(s) "<file1>, <file2>" can’t be shared via public link (classified as <tag>), where <tag> is the tag chosen for the classification rule.
Unprotected Links Expire After X Days
The policy Unprotected links expire after X days enables administrators to define public link expiration policies depending on the classification levels of the data that is shared via public links without password protection.
This makes it possible, for instance, to allow documents classified as public to be shared via public links for 30 days while documents classified as internal require public links to expire after seven days. To enable such policies, just define an expiration period associated with the classification rule for the respective classification level.
| The Password Policy extension also provides options to enforce public link expiration depending on whether the user sets a password or not. |
The option "X days until link expires if password is not set" is mutually exclusive with this policy. When you enable the Password Policy option, it will always be dominant and effectively override the policy discussed in this section. In contrast, the Password Policy option "X days until link expires if password is set" can be used in parallel.
| The Sharing settings option provides the means to define a general public link expiration policy. This option currently is also mutually exclusive and will always override the policy discussed in this section. |
Setting Up Policies Without Automated Classification Based on Document Metadata
All policies can also be enforced when using Manual Classification or Automated Classification based on File or User Properties. For this, specify the tag that determines the files that the policy should apply to and leave the fields for "Property XPath" and "Property Value" empty. Then choose the desired policy and click Save.
Access Policies
Access policies are restrictions that prevent users or groups of users from accessing specific resources even though they appear in their file list, e.g., via a share from another user. They are provided by the File Firewall extension which currently supports policies to prevent access to classified documents.
To link access policies with classification levels, the bottom line of such policies is the associated classification tag ([System file tag] [is] [<tag>]).
It can, for instance, be combined with the following conditions to realize exclusive ([is]) or inclusive ([is not]) policies:
Documents with the respective classification tag can’t be accessed:
-
User group: by users that are a member of the configured group (or can only be accessed by users that are a member of the configured group when using the
[is not]operator). -
User device: from the configured device(s) (or only from the configured devices when using the
[is not]operator) -
Request time: within the configured time frame (or only within the configured time frame when using the
[is not]operator) -
IP Range (Source network): from the configured IP range (or only from the configured IP range when using the
[is not]operator)
Logging
When classified documents are uploaded, log entries will be written to ownCloud’s log file, (data/owncloud.log).
For this, it is possible to additionally specify another metadata property that will be used to add its value to the log entries in the form of a "Document ID".
With this, it is possible to filter the log according to a document identifier or to forward classification events for certain documents to external log analyzers. To set it up, add the desired property XPath to the "Document ID XPath" field of the respective rule as you did for the classification property.
Each uploaded file will generate three entries with different log levels. See some exemplary entries below:
INFO:  "Checking classified file 'confidential.xlsx' with document id '2'"
INFO:  "Alice uploaded a classified file 'confidential.xlsx' with document class 'Confidential'"
DEBUG: "Assigning tag 'Class: Confidential' to 'confidential.xlsx'"
Limitations
Automated Classification Based on Document Metadata: Handling Classification Changes for Existing Files
-
When a formerly classified document is replaced with a new version that does not contain classification metadata, the classification tag will remain assigned, and configured policies will still apply. In this case, it is recommended to either delete the original or upload the new version with a different name.
-
When a formerly unclassified document is replaced with a new version that does contain classification metadata, the classification tag will be assigned. However, when the policy "Prevent upload" is set up in addition, the original file will be deleted, and the new version will be rejected due to the policy.