Configuring Federation Sharing
Introduction
With Federated Cloud Sharing, you can easily and securely link file shares between ownCloud servers, in effect creating a "cloud" of ownCloud installations.
|
Configuration
Follow these steps to establish a trusted connection between two servers.
-
Verify that both servers have SSL certificates.
If you open the server URL in your browser and see a lock icon on the left-hand side of the address bar, the certificate is valid:Lock icon in the address bars in Firefox, Google Chrome, and Safari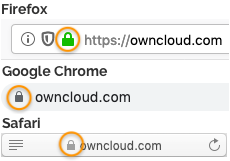
-
Verify that OWNCLOUD_OVERWRITE_CLI_URL is set to
'https://<YOUR-SERVER-URL>'instead oflocalhost: -
Navigate to
-
Add server 1 to the trusted servers on server 2
-
Add server 2 to the trusted servers on server 1
-
Run on both servers:
docker compose exec owncloud occ system:cron -
Run the
OCA\Federation\SyncJobjob with theforceoption on both servers.
You can get the corresponding job ID by using thebackground:queue:statusocc command:docker compose exec owncloud occ background:queue:execute --force <jobId> -
The check should now be green
-
Now sync your users by running on both servers
docker compose exec owncloud occ dav:sync-system-addressbook docker compose exec owncloud occ federation:sync-addressbook -
Configure automatic acceptance of new federated shares
Automatic acceptance of new federated shares will not work if the option Add server automatically once a federated share was created successfullyis also set. This is done because of security concerns.docker compose exec owncloud occ config:app:set federation auto_accept_trusted --value '0' docker compose exec owncloud occ config:app:set federatedfilesharing auto_accept_trusted --value 'yes'
Working With Proxies
Some ownCloud instances are not connected to the internet. They cannot access the public network. Therefore, federation will not work without a proxy.
Set the OWNCLOUD_PROXY and OWNCLOUD_PROXY_USERPWD configuration variables.
Creating a New Federation Share
Follow these steps to create a new Federation share between two ownCloud servers. This requires no action by the user on the remote server; all it takes is a few steps on the originating server.
-
Enable the Federation app.
-
Create a federated share by entering username@serveraddress in the sharing dialog (for example
freda@https://example.com/owncloud). When ownCloud verifies the link, it displays it with the (federated) label. Click on this label to establish the link.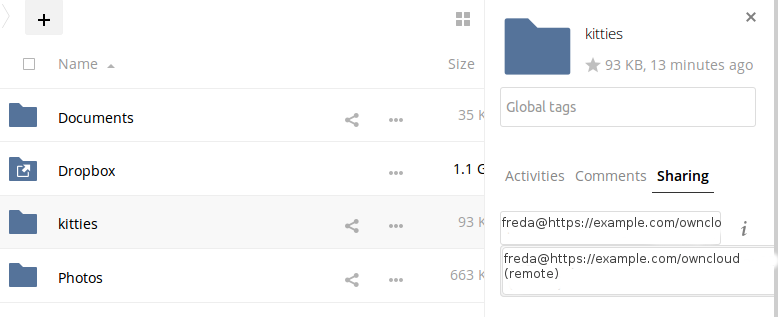
-
When the link is successfully completed, you have a single share option, and that is can edit.
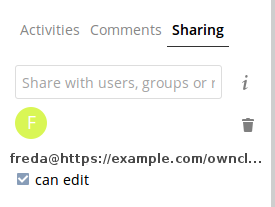
You may disconnect the share at any time by clicking the trash can icon.
Federated Sharing Scanner CronJob Configuration
The Federated Sharing Scanner is a background job used to scan the federated shares to ensure the integrity of the file cache.
On each run the scanner will select federated shares that satisfy these requirements:
-
Ensure that within a single cron run, at max cronjob_scan_external_batch scans will be performed out of all accepted external shares (default 100)
-
A scan of that external share has not been performed within the last cronjob_scan_external_min_scan seconds (default 3 hours)
-
The user still exists, and has been active recently, meaning logged in within the last cronjob_scan_external_min_login seconds (default 24 hours)
-
There has been a change in the federated remote share root etag or mtime, signaling a mandatory rescan
To enable the cronjob, go to and enable the checkbox:

Alternatively you can use the command line:
docker compose exec owncloud occ config:app:set files_sharing cronjob_scan_external_enabled --value 'yes'You can also configure these settings of the cronjob:
-
the minimum amount of time since last login of a user so that a scan is triggered (ensures only active users get fed shares synced)
docker compose exec owncloud occ config:app:set files_sharing cronjob_scan_external_min_login --value <integer-seconds>
-
the minimum amount of time since last scanned so that the next scan is triggered (avoid frequent scan when active collaboration)
docker compose exec owncloud occ config:app:set files_sharing cronjob_scan_external_min_scan --value <integer-seconds>
-
the maximum number of federated share scans per 10 minutes (scan performed only if fed share files got updated)
docker compose exec owncloud occ config:app:set files_sharing cronjob_scan_external_batch --value <integer-number> -
Use the following command to force a run of the scanner cronjob:
docker compose exec owncloud occ background:queue:execute --force --accept-warning <id-of-fed-scanner-job>
Known Issues
Persistent Locks Are Not Guaranteed
There is a known bug in propagation of persistent locks to federated instances. If a user creates an exclusive lock on a share, no other users should be able to modify it, nor its contents, and all users should see a lock icon on the share.
However, this isn’t the case. The following functionality has been recorded:
-
The user who created the lock sees the lock icon throughout the share.
-
The top-level of the share for receivers shows the lock icon.
-
Sub-items of the share do not show the lock icon.
-
The share and its contents can still be modified by all users; specifically:
-
Sub-items can be deleted.
-
Sub-items can be created.
-
Tips
VCARD properties
It is possible to configure the VCARD properties that are searched in order to retrieve a list of federated users in the share dialog. By default, ownCloud uses CLOUD and FN properties, however this list may be configured by the admin:
docker compose exec owncloud occ config:app:set dav remote_search_properties --value=CLOUD,FN,EMAILPossible values are:
-
VERSION
-
UID
-
FN
-
N
-
EMAIL
-
CLOUD
The value CLOUD enables searching by federation ID. Note that when EMAIL or CLOUD are enabled, hostnames are included in the search. Results are then returned for substrings of the hostname part, even when no user related field matches.
Listing Federated Shares
In case you want to see which federated shares exist on your server, you can use this command to list them.
Currently there is no ownCloud occ command to list federated shares, that’s why you have to use these database queries to obtain the information.
Federated shares are saved in your database.
sudo mysql -u <ownCloud_DB_User> -p<ownCloud_DB_Password> -h <ownCloud_DB_Host> <ownCloud_DB_Name>Incoming shares can be listed with the following query:
select * from oc_share where share_type=6;Each unique ID gives you an incoming federated share.
Outgoing shares can be listed with the following query: (replace cloud.example.com with your instance URL)
select * from oc_share_external where remote NOT IN ('https//cloud.example.com');Each unique ID gives you an outgoing federated share.
Exit the database console with this command:
quit