User Management
Introduction
This page shows common tasks for administrators when managing users.
Note that most user-related tasks can also be managed via occ commands for managing users.
Default View
The default view displays basic information about your users.
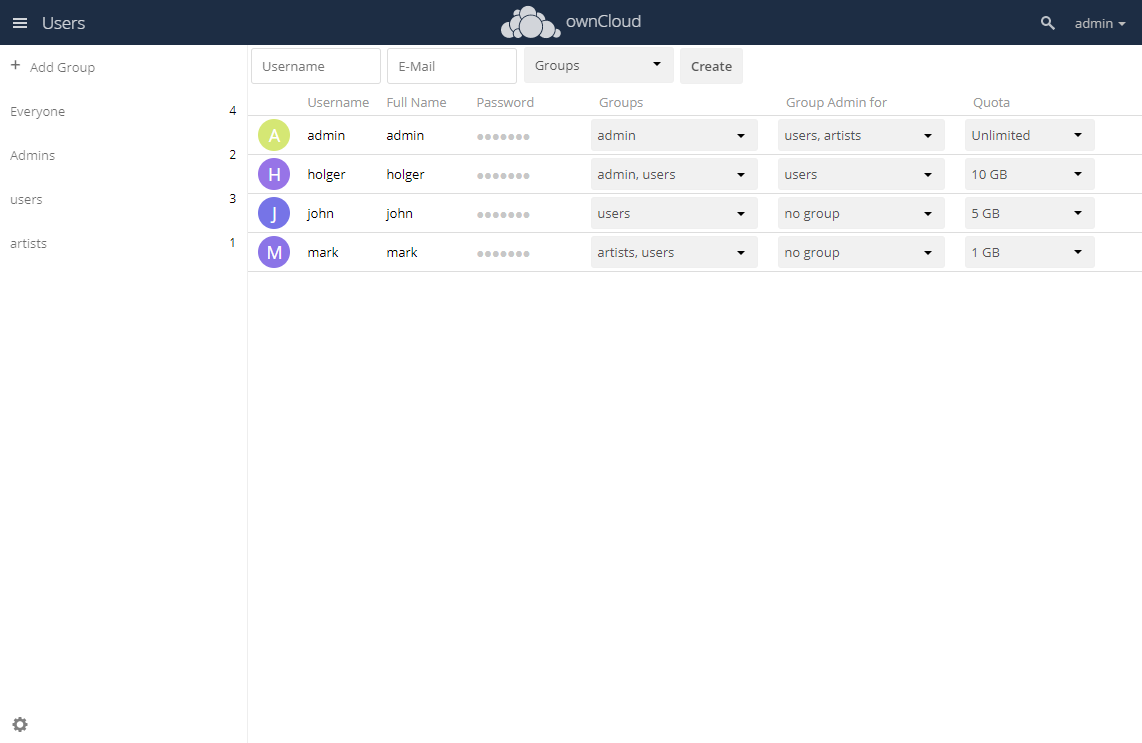
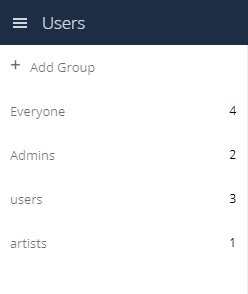
The Group filter on the left sidebar lets you quickly filter users by their group memberships, and create new groups.
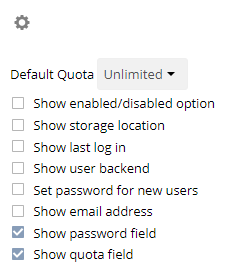
Click the gear icon on the lower left sidebar to view the available settings.
User accounts have the following properties:
- Login Name (Username)
-
The unique ID of an ownCloud user. Note that it cannot be changed after creating the user. The user can log in either using the login name or the e-mail address.
- Full Name
-
The user’s display name that appears on file shares, the ownCloud Web interface and emails. Admins and users may change the full name anytime. If the full name is not set, it defaults to the login name.
- Password
-
The admin sets the new user’s first password. Both the user and the admin can change the user’s password at anytime.
-
The admin sets the new user’s e-mail. The user then gets an e-mail to set the password. Both the user and the admin can change the user’s e-mail at anytime.
- Groups
-
You may create system (non-LDAP) groups and assign system group memberships to users. By default, new users are not assigned to any groups.
- Group Admin
-
Group admins are granted administrative privileges on system groups and can add new users, edit user properties, and remove existing users from those groups.
- Quota
-
The maximum disk space assigned to each user. Any user that exceeds the quota cannot upload or sync data. You have the option to include external storage in user quotas.
Creating a New User
To create a user account:
-
Enter the new user’s Login Name and their E-Mail
-
Optionally, assign Groups memberships
-
Click the Create button
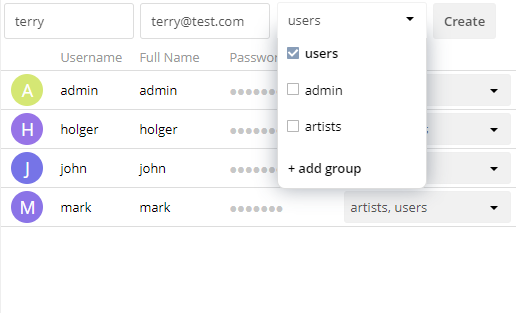
Login names may contain letters (a-z, A-Z), numbers (0-9), dashes (-), underscores (_), periods (.) and at signs (@). After creating the user, you may fill in their Full Name if it is different from the login name, or leave it for the user to complete.
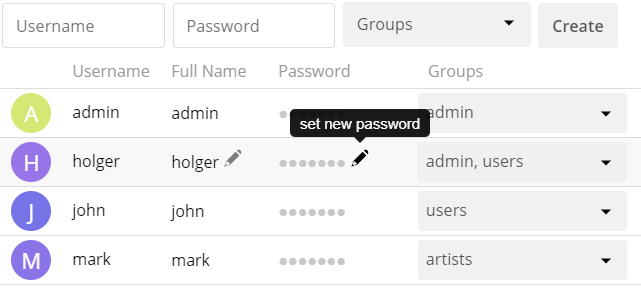
Password Reset
You cannot recover a user’s password, but you can set a new one:
-
Hover your cursor over the user’s Password field
-
Click on the pencil icon
-
Enter the user’s new password in the password field, and remember to provide the user with their password
If you have encryption enabled, there are special considerations for user password resets.
Renaming a User
Each ownCloud user has two names: a unique Login Name used for authentication, and a Full Name, which is their display name. You can edit the display name of a user, but you cannot change the login name of any user.
To set or change a user’s display name:
-
Hover your cursor over the user’s Full Name field
-
Click on the pencil icon
-
Enter the user’s new display name
Deleting Users
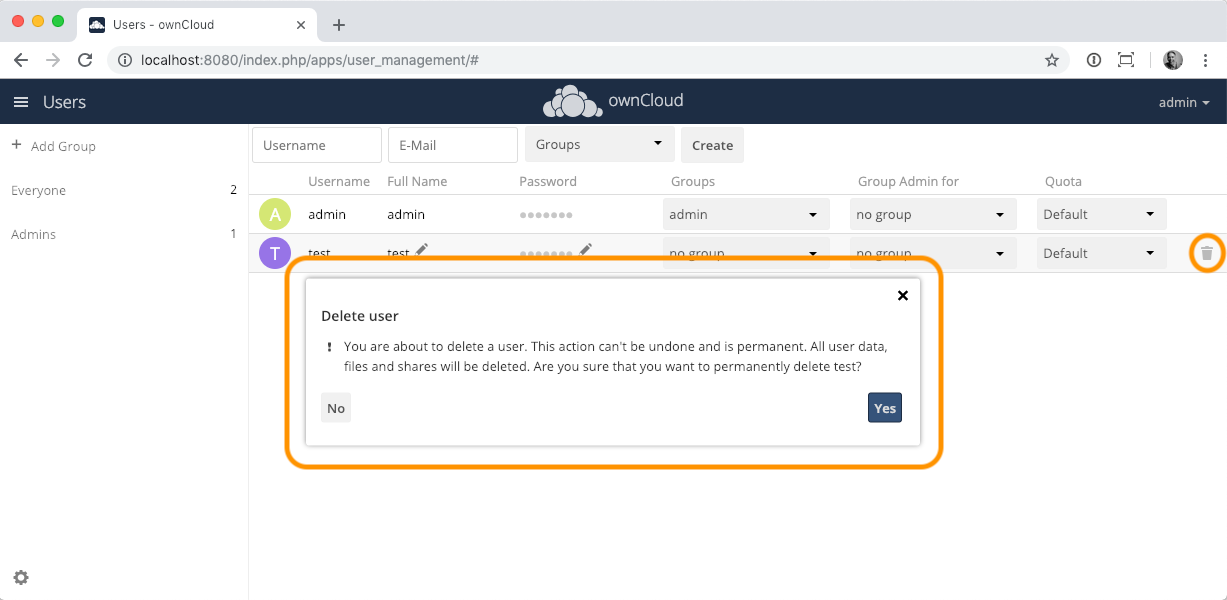
To delete a user, hover your cursor over their name on the Users page and click the trashcan icon that appears at the far right. You’ll then see a confirmation dialog appear, asking if you’re sure that you want to delete the user.
If you click Yes, the user is permanently deleted, including all the files owned by the user, including all files they have shared. If you need to preserve the user’s files and shares, you must first download them from their ownCloud Files page, (which compresses them into a zip file).
Alternatively, you can use a sync client to copy them to your local computer.
If you click No, the confirmation dialog will disappear and the user is not deleted.
| See File Sharing Configuration to learn how to create persistent file shares that survive user deletions. |
Granting Administrator Privileges
ownCloud has two types of administrators:
-
ownCloud Administrators have full rights on your ownCloud server and can access and modify all settings. To assign the ownCloud administrator role to a user, simply add them to the
admingroup. -
Group Administrators. Group administrators have the rights to create, edit and delete users in their assigned system (non-LDAP) groups. Use the dropdown menus in the Group Admin column to assign group admin privileges.
Managing Groups
You can assign new users to groups when you create them, and create new groups when you create new users. You may also use the Add Group button at the top of the left pane to create new groups. New group members will immediately have access to file shares that belong to their new groups.
Enabling Custom Groups
As the next step in managing groups, you can enable the Custom Groups app which provides group management to users. For details see the Custom Groups App.
Setting Storage Quotas
There are 4 types of quota settings in ownCloud when dealing with LDAP users.
Quota Field
Found in , this setting overwrites the rest. If set, this is what will be set for an LDAP user’s quota in ownCloud.
Default Quota
This will be used if no quota is set and is found in . If the Quota is not set, but Default Quota is, and a systems administrator tries to set a quota for an LDAP user with User Quota, it will not work since it is overridden by Default Quota.
Click the gear icon on the lower left pane to set a default storage quota. This is automatically applied to new users. You may assign a different quota to any user by selecting a preset value from the Quota dropdown or by entering a custom value. When you create custom quotas, use the usual abbreviations for your storage values such as 500 MB, 5 GB, 5 TB, and so on.
External Storage Quota
You have a configurable environment variable that controls whether external storage is counted against user’s quotas. This is still experimental and may not work as expected. The default is to not count external storage as part of user storage quotas. If you prefer to include it, set the value to true:
OWNCLOUD_QUOTA_INCLUDE_EXTERNAL_STORAGE=falseStorage Space Considerations
Metadata (such as thumbnails, temporary files, and encryption keys) takes up about 10% of disk space but is not counted against user quotas. Users can check their used and available space on their Personal pages. Only files that originate from a user, or are in a share owned by the user, count against that user’s quota, not file shares received from other users. For example, if you upload files to a different user’s share, those files count against that user’s quota. If you share a folder with other user’s and they add files to that folder, then those files count against your quota. If you re-share a file that another user shared with you, that file does not count against your quota, but the originating user’s.
Encrypted files are a little larger than unencrypted files; the unencrypted size is calculated against the user’s quota.
Deleted files that are still in the trash bin do not count against quotas. The trash bin is set to 50% of quota. Deleted file aging is set to 30 days. When deleted files exceed 50% of quota, then the oldest files are removed until the total is below 50%.
User GDPR Requests
To comply with article 15 of the GDPR framework, ownCloud provides buttons in all users' personal settings view which can be accessed via to:
-
Request data export
-
Request account deletion
When a user clicks on one of these buttons, the admin group will receive an email with the user’s request for further processing.
Moving the User Home
Usually, a user’s home folder is located in the directory defined by the environment variable OWNCLOUD_VOLUME_FILES and defaults to the containers internal path /mnt/data/files. The directory /mnt/data is used as a Docker volume and mounted locally. In smaller installations, the bind mount is often a physically mounted drive of the server. On larger installations, this directory is usually mounted via NFS. This can be less than ideal for very big installations with thousands of users and/or users with very big space consumption. This can result in a high load on a single mount point.
ownCloud offers moving the home folder location of single users from the default location to another path outside the data directory to distribute the load to different mount points. You can also move back a user’s home to the default location.
| In general, moving a user’s home should be the last step after all optimizations of the mount point have been done. Carefully monitor over a period of time the changes made before moving a user’s home. |
Steps to Move a User’s Home
For details of the occ user commands used below, see the User Commands section of the occ command reference. The examples use the user ID lisa and the mount for the new home is /mnt/newhome_1.
-
To report a users home, use the following command:
docker compose exec owncloud occ user:list lisa -a home
  - lisa: /mnt/data/files/lisa
Here you can see, that the home of user
lisais located in/mnt/data/files/lisa -
Prepare new mounts in advance for one or more users:
Use the OS methods to create one or more new mount points for users home directories not located as defined in config.php. You can create as many new homes as required containing as many new user homes as wanted - there is no ownCloud limitation. The mounts must be fully accessible by the webserver user (usually www-data).
-
Move the users home:
-
To move a users home, the target folder must not contain a subfolder with the user’s ID.
-
The target folder can contain other user folders.
docker compose exec owncloud occ user:move-home lisa /mnt/newhome_1The user gets disconnected and the user’s home is now moved which may take a while depending on the load of the server and the bandwidth available on the mount points. When the move operation has finished,
-
all data from the user is copied to the new home,
-
the new path is set in the ownCloud database and
-
the user gets enabled again.
After checking, the old user’s home location can safely be deleted manually.
If you are using LDAP and the LDAP Home Connector app, update the user’s home mount in the attribute used accordingly. -
-
To check the user’s new home, use the following command:
docker compose exec owncloud occ user:list lisa -a home
  - lisa: /mnt/newhome_1/lisa
Here you can see that the home of user
lisais now located in/mnt/newhome_1/lisa. -
To list the available user home root directories, use the following command:
The following command lists all available user homes. Note a home only gets listed, if it contains at least one user.
docker compose exec owncloud occ user:home:list-dirs - /mnt/data/files - /mnt/newhome_1/lisa -
To list all users from a users home root directory, use the following command:
The following command lists all users from a given home.
docker compose exec owncloud occ user:home:list-users /mnt/data/files
  - admin
  - user01