Installing and Managing Apps
Introduction
After installing ownCloud, you may provide added functionality by installing applications.
Installing and Managing Apps
Installing Apps Via the ownCloud Marketplace

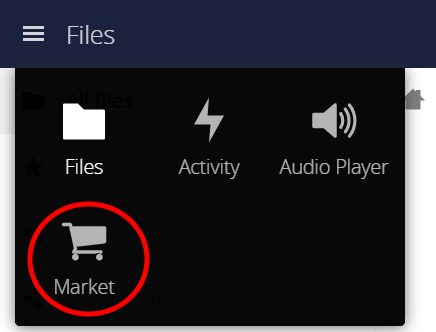
To add an app, use the Market app, which is accessible from the top-level navigation bar, on the left-hand side of the page. Once in the Market app, click an app’s name to view more details about it. Once you have done this, you can also install it by clicking Install. Clicking Install, downloads it from the ownCloud Marketplace, installs, and enables it.
Sometimes the installation of a third-party app fails silently, possibly because appcodechecker' ⇒ true, is enabled in config.php.
When appcodechecker is enabled, it checks if third-party apps are using the private API, rather than the public API.
If they are, they are not installed.
| If you would like to create or add (your own) ownCloud app, please refer to the developer manual. |
Installing Apps Manually
To install an app manually, instead of by using the Market app, extract the app tarball into your ownCloud installation’s default app folder (</path/to/owncloud>/apps) or, ideally, into a custom app directory.
Once the tarball has been extracted into the default app folder. Enable the application,
-
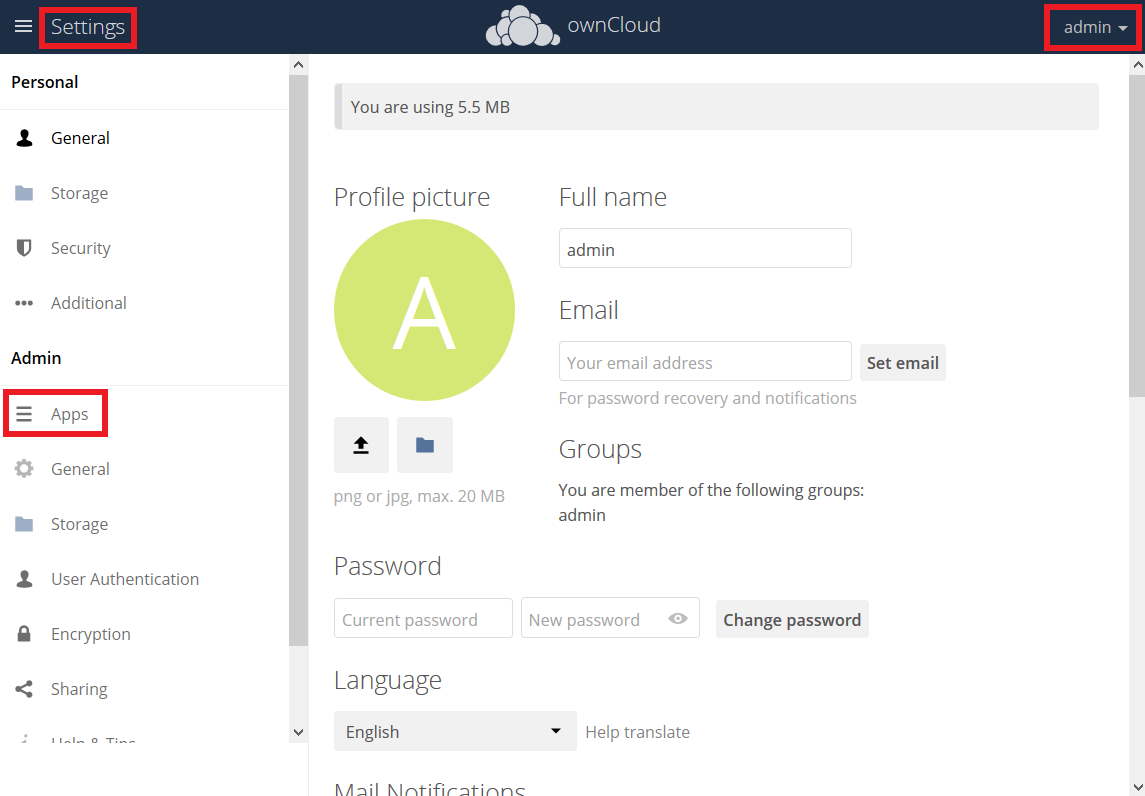
by Navigating to and clicking Enable; or the
Managing Apps
Some apps are installed and enabled during ownCloud installation, while other apps can be installed and enabled post-installation.
|
Supported Enterprise Apps See supported apps for a list of supported Enterprise edition apps. |
View App Status

To see the status of your installation’s applications, go to your Apps page, via . There, you will see which apps are currently: enabled, not enabled, and recommended. You’ll also see additional filters, such as Multimedia, Productivity, and Tool for finding more apps quickly.
Using Custom App Directories
There are several reasons for using custom app directories instead of ownCloud’s default. These are:
-
It separates ownCloud’s core apps from user or admin downloaded apps. Doing so distinguishes which apps are core and which aren’t, simplifying upgrades.
-
It eases manual upgrades. Having non-core apps in a directory separate to the core app directory makes them simpler to manage.
-
ownCloud may gain new core apps in newer versions. Doing so orphans deprecated apps, but doesn’t remove them.
If you want to store apps in a custom directory, instead of ownCloud’s default (/app), you need to modify the apps_paths element in config/config.php.
There, you need to add a new associative array that contains three elements.
These are:
path-
The absolute file system path to the custom app folder.
url-
The request path to that folder relative to the ownCloud webroot, prefixed with
/. writable-
Whether users can install apps in that folder.
After adding the configuration, ownCloud only installs apps in directories where writable is set to true.
The configuration example below shows how to add a second directory, called apps-external.
<?php
$CONFIG = [
  'apps_paths' => [
     [
       'path' => OC::$SERVERROOT.'/apps',
       'url' => '/apps',
       'writable' => false,
     ],
     [
       'path' => OC::$SERVERROOT.'/apps-external',
       'url' => '/apps-external',
       'writable' => true,
     ],
  ],
  // remainder of the configuration
];
After you add a new directory configuration, you can then move apps from the original app directory to the new one. To do so, follow these steps:
-
Disable the apps that you want to move.
-
Create a new apps directory and assign it the same user and group, and ownership permissions as the core apps directory.
-
Move the apps from the old apps directory to the new apps directory.
-
Add a new app directory in
config/config.php. -
If you’re using a cache, such as Redis or Memcached, ensure that you clear the cache.