Oracle Database Setup & Configuration
Introduction
This document will cover the setup and preparation of the ownCloud server to support the use of Oracle as a backend database.
Outline of Steps
This document will cover the following steps:
-
Setup of the ownCloud user in Oracle: This involves setting up a user space in Oracle for setting up the ownCloud database.
-
Installing the Oracle Instant Client on the Web server (facilitating the connection to the Oracle Database).
-
Compiling and installing the Oracle PHP Plugin oci8 module
-
Pointing ownCloud at the Oracle database in the initial setup process
The document assumes that you already have your Oracle instance running, and have provisioned the needed resources. It also assumes that you have installed ownCloud with all of the prerequisites.
Configuring Oracle
Setting up the User Space for ownCloud
Step one, if it has not already been completed by your DBA (DataBase Administrator), provision a user space on the Oracle instance for ownCloud. This can be done by logging in as a DBA and running the script below:
CREATE USER owncloud IDENTIFIED BY password;
ALTER USER owncloud DEFAULT TABLESPACE users TEMPORARY TABLESPACE temp QUOTA unlimited ON users;
GRANT create session, create table, create procedure, create sequence, create trigger, create view, create synonym, alter session TO owncloud;
Substitute an actual password for password. Items like TableSpace,
Quota etc., will be determined by your DBA (database administrator).
Add OCI8 Client Packages
Installation of the OCI8 client is dependent on your distribution. Given that, please use the relevant section below to find the relevant instructions to install the client.
Ubuntu
If you’re using Ubuntu, we recommend that you use this very thorough guide to install the Oracle Instant Client (OCI8) extension from the Ubuntu Community Wiki.
| This should work for other Debian-based distributions too, however your mileage may vary. |
RedHat / Centos / Fedora
To install the OCI8 extension on a RedHat-based distribution, you first need to download two Oracle Instant Client packages:
-
Instant Client Package - Basic (
oracle-instantclient12.2-basic-12.2.0.1.0-1.x86_64.rpm) -
Instant Client Package - SDK (
oracle-instantclient12.2-devel-12.2.0.1.0-1.x86_64.rpm)
Then, to install them, use the following commands:
rpm --install oracle-instantclient12.2-basic-12.2.0.1.0-1.x86_64.rpm \
    oracle-instantclient12.2-devel-12.2.0.1.0-1.x86_64.rpm
Install the OCI8 PHP Extension
With the Oracle packages installed you’re now ready to install PHP’s OCI8 extension, where you have to specify the correct OCI8 version. For PHP7.x use oci8-2.2.0
Provide: instantclient,/usr/lib/oracle/12.2/client64/lib when requested, or let it auto-detect the location, if possible.
|
sudo pecl install oci8-2.2.0With the extension installed, you now need to configure it, by creating
a configuration file for it. You can do so using the command below,
substituting FILE_PATH with one from the list below the command.
cat << EOF > FILE_PATH
; Oracle Instant Client Shared Object extension
extension=oci8.so
EOFConfigure ownCloud
The next step is to configure the ownCloud instance to point to the Oracle Database, again this document assumes that ownCloud has previously been installed.
Configuration Wizard
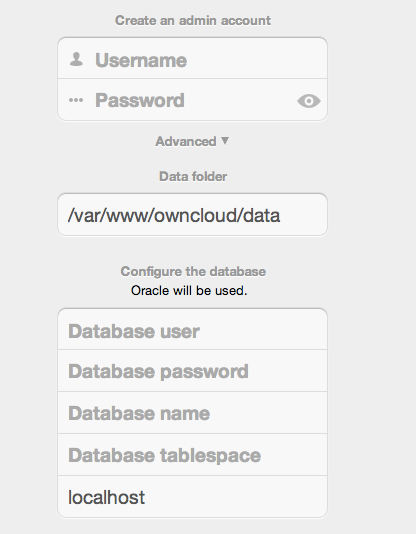
Database password
Again this is defined in the script from section 2.1 above, or pre-configured and provided to you by your DBA.
Database Name
Represents the database or the service that has been pre-configured on the TSN Listener on the Database Server. This should also be provided by the DBA. In this example, the default setup in the Oracle install was orcl (there is a TSN Listener entry for orcl on our database server).
This is not like setting up with MySQL or SQL Server, where a database based on the name you give is created. The oci8 code will call this specific service and it must be active on the TSN Listener on your Oracle Database server.
Configuration File
Assuming all of the steps have been followed to completion, the first run wizard should complete successfully, and an operating instance of ownCloud should appear.
The configuration file should look something like this:
Useful SQL Commands
Is my Database Reachable?
On the machine where your Oracle database is installed, type:
sqlplus usernameSQL> select * from v$version;
BANNER
--------------------------------------------------------------------------------
Oracle Database 11g Express Edition Release 11.2.0.2.0 - 64bit Production
PL/SQL Release 11.2.0.2.0 - Production
CORE 11.2.0.2.0 Production
TNS for Linux: Version 11.2.0.2.0 - Production
NLSRTL Version 11.2.0.2.0 - Production
SQL> exitShow Database Users:
Oracle : SELECT * FROM all_users;Show available Databases:
Oracle : SELECT name FROM v$database; (requires DBA privileges)Show ownCloud Tables in Database:
Oracle : SELECT table_name FROM user_tables;Quit Database:
Oracle : quit