Impersonating Users
Introduction
To help users debug an issue or to get a better understanding of what they see when they use their ownCloud account, you can impersonate their ownCloud user. The ability to do so is a feature delivered via an ownCloud app called Impersonate.
Limitations
-
This functionality is available to administrators only.
-
Impersonating is not possible when the specific user has never logged in before.
Impersonating a User
When installed, you can then impersonate users; in effect, you will be logged in as a specific user. To do so, go to the Users list, where you will now see a new column available called Impersonate, as in the screenshot below.
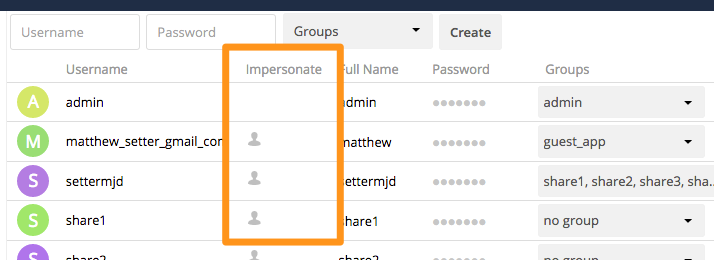
Click the gray head icon next to the user that you want to impersonate. Doing so will log you in as that user, temporarily pausing your current session. You will see a notification at the top of the page that confirms you’re now logged in as (or impersonating) that user.
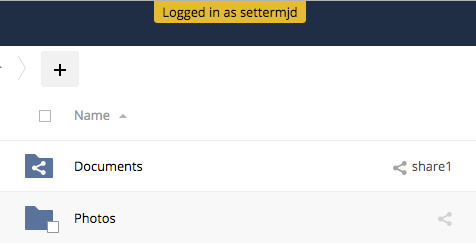
Anything that you see until you log out will be what that user would see.
Ending an Impersonation
When you’re ready to stop impersonating the user, log out and you will return to your normal user session.
Group Concept for Impersonation
Impersonate has two layers defining groups for impersonation. It is important to understand, that both the impersonator and the user to be impersonated must have the Impersonate app enabled. This means, if any groups are defined at the two layers, they must have an overlapping member area.
-
The first layer is defined at the level of the app, see Define Who can Use Impersonate. This layer can be seen as a general area. If you do not want to have any restrictions, uncheck the checkbox, which means all users are eligible.
-
The second layer is defined at the level where the one who can impersonate and who can be impersonated are configured. See Define Who is Allowed to Impersonate. This layer can be regarded as the detailed area.
As a rule of thumb, first enable (1) as widely as wanted, then add option (2) as needed.
| If an impersonator is granted the right to impersonate but cannot impersonate all or particular users, then the reason is usually that the impersonator is not a member of the respective groups. |
Define Who can Use Impersonate
-
If you have installed and enabled the Impersonate App, you can define if any groups are granted the right to use impersonation. To do so, go to . Members of the groups specified can use the Impersonate app, see Define Who is Allowed to Impersonate

-
You can also use an occ command to enable the Impersonate app for all users:
sudo -u www-data ./occ config:app:set \ impersonate enabled --value 'yes' -
You can also use an occ command to define groups whose members are granted the right to use impersonation:
sudo -u www-data ./occ config:app:set \
    impersonate enabled --value '["admin","einstein-g"]'
-
Define Who is Allowed to Impersonate
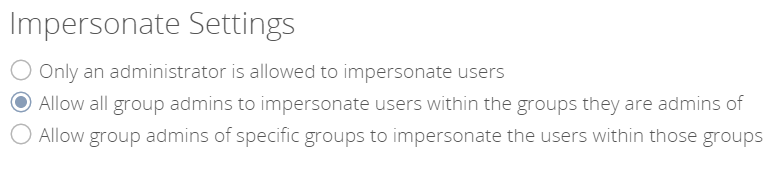
As a security measure, the application lets ownCloud administrators restrict the ability to impersonate users to:
-
ownCloud administrators only.
-
All group administrators.
-
Administrators for specific groups.
| By default, when the Impersonate app is installed and no further configuration is taken, only ownCloud administrators will be allowed to impersonate users. |
To configure impersonation, go to the administrator settings panel, which you can find under , at section titled: Impersonate Settings.
-
Use the following to allow impersonation for ownCloud admins only:

-
You can also use occ commands to do so:
sudo -u www-data ./occ config:app:set \
    impersonate impersonate_all_groupadmins --value false
sudo -u www-data ./occ config:app:set \ impersonate impersonate_include_groups --value falsesudo -u www-data ./occ config:app:set \ impersonate impersonate_include_groups_list --value '[]'
-
-
If you want to allow all group admins to impersonate users within groups which they administer:
-
You can also use occ commands to do so:
sudo -u www-data ./occ config:app:set \
    impersonate impersonate_all_groupadmins --value true
sudo -u www-data ./occ config:app:set \ impersonate impersonate_include_groups --value falsesudo -u www-data ./occ config:app:set \ impersonate impersonate_include_groups_list --value '[]'
-
-
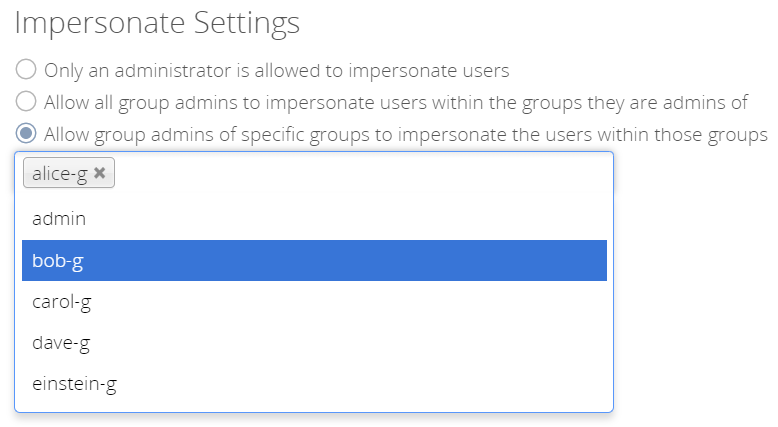
If you want to limit impersonation to admins of specific groups, first click Allow group admins of specific groups…. With the option checked, click into the textbox underneath it. You will see a list of all groups on your ownCloud installation, which will change, based on what you type in the textbox to search for specific groups. Choose one or more groups from the list, and they will be added to the textbox, restricting this functionality to admins of those groups only.
-
You can also use occ commands to do so:
sudo -u www-data ./occ config:app:set \
    impersonate impersonate_all_groupadmins --value false
sudo -u www-data ./occ config:app:set \ impersonate impersonate_include_groups --value truesudo -u www-data ./occ config:app:set \ impersonate impersonate_include_groups_list --value '["group1", "group2"]'
-