Encryption Configuration
- Introduction
- General Notes
- Which Data Is Encrypted and When
- Using a Hardware Security Module (HSM)
- Encryption Types
- Before Enabling Encryption
- Enable the Encryption App
- Basic Configuration via the Web-UI
- Master-Key-Based Encryption
- Enabling Master Key Based Encryption from the Command-Line
- View Current Encryption Status
- Replacing an Existing Master Key
- Decrypt Master-Key Encryption
- Disable Encryption
- View Current Encryption Status
- Enable Users' File Recovery Keys
- Changing the Recovery Key Password
- Decrypt User-Key Encryption
- Disable Encryption
- Move Key Location
- LDAP and Other External User Back-ends
- Encrypting External Mountpoints
- Sharing Encrypted Files
Introduction
The primary purpose of the ownCloud server-side encryption is to protect users’ files when they’re located on remote storage sites, such as Dropbox and Google Drive, smoothly and seamlessly from within ownCloud.
General Notes
Since ownCloud 9.0, server-side encryption for local and remote storage can operate independently. This allows encrypting a remote storage independent of the home storage on the ownCloud server.
| Starting with ownCloud 9.0 we support Authenticated Encryption for all newly encrypted files. See Exploiting unauthenticated encryption mode for more technical information about the impact. |
For maximum security, make sure to configure external storage with . This will let ownCloud ignore new files not added via ownCloud. This way, a malicious external storage administrator cannot add new files to the storage without your knowledge. However, you may not use this setting if your external storage is subject to legitimate external changes.
ownCloud’s server-side encryption encrypts files stored on the ownCloud server and files on remote storage sites that are connected to your ownCloud server. Encryption and decryption are performed on the ownCloud server. All files sent to remote storage will be encrypted by the ownCloud server and decrypted before serving them to you or any users that you shared them with.
|
When files on an external storage are encrypted in ownCloud, you cannot share them directly from the external storage services, but only through ownCloud sharing. This is because the key to decrypt the data never leaves the ownCloud server.
ownCloud’s server-side encryption generates a strong encryption key, which is unlocked by the user’s password. As a result, your users don’t need to track an extra password. All they need to do is log in as they normally would. ownCloud transparently encrypts only the contents of files but not filenames and directory structures.
Location of Encryption Keys
The encryption keys are stored in the following directories:
| Type | Directory | Description |
|---|---|---|
Master Key |
|
Location of the master key necessary to decrypt files. |
User Key |
|
Location of the user key and share key per file necessary to decrypt files. |
| You can move the keys to a different location. To do so, refer to the Move Key Location section of the documentation. |
| You should regularly back up all encryption keys to prevent permanent data loss. |
Rules and Restrictions
When encryption is enabled, all files are encrypted and decrypted by the ownCloud application and stored encrypted on your local or remote storage. The latter protects your data on externally hosted storage. An ownCloud admin and a storage admin will only see encrypted files when directly browsing backend storage.
Encryption keys are stored only on the ownCloud server, eliminating exposure of your data to third-party storage providers. The encryption application does not protect your data if your ownCloud server is compromised, and it does not prevent ownCloud administrators from reading users’ files.
This would require client-side encryption, which this application does not provide. If your ownCloud server is not connected to any external storage services, it is better to use other encryption tools, such as file-level or whole-disk encryption.
|
SSL terminates at the same time or before the web server on the ownCloud server. Consequently, all files are in an unencrypted state between the SSL connection termination and the ownCloud code that encrypts and decrypts them. This is potentially exploitable by anyone with administrator access to your server. For more information, read: How ownCloud uses encryption to protect your data. |
Which Data Is Encrypted and When
The following data is encrypted:
-
Users' files in their home directory trees if enabled by the admin.
Location:data/<user>/files, see the: occ encryption command set -
External storage if enabled either by the user or by the admin
The following is never encrypted:
-
File names or folder structures
-
Existing files in the trash bin
-
Existing files in Versions
-
Image thumbnails
-
Previews from the Files app
-
The search index from the full text search app
-
Third-party app data
Note that there may be other not mentioned files that are not encrypted.
When are files encrypted
If not otherwise decided by the admin, only new and changed files after enabling encryption are encrypted.
| An admin can encrypt existing files post enabling encryption via an occ encryption command. |
Using a Hardware Security Module (HSM)
When using a HSM, see the additional information provided at The HSM (Hardware Security Module) Daemon (hsmdaemon)
Encryption Types
ownCloud only provides the master key encryption type. There is only one key (or key pair) and all files are encrypted using that key pair.
| User-Key encryption has been deprecated with ownCloud release 10.7. Existing installations using this method must migrate to master key encryption. |
Before Enabling Encryption
Plan very carefully before enabling encryption, because it is not reversible via the ownCloud Web interface. If you lose your encryption keys, your files are not recoverable. Always have backups of your encryption keys stored in a safe location, and consider enabling all recovery options.
You have more options via the occ command’s encryption options.
|
You can’t manage encryption without access to the command line. If your ownCloud installation is on a hosted environment and you don’t have access to the command line, you won’t be able to run occ commands. In this case, don’t enable encryption! |
Enable the Encryption App
Before you can use encryption, you must enable the encryption app. You can do this either on the command-line or in the Web-UI.
Enable Encryption From the Command-Line
To enable the encryption app, run the following command:
sudo -u www-data ./occ app:enable encryptionsudo -u www-data ./occ encryption:enableIf the encryption app is successfully enabled, you should see the following confirmations:
encryption enabled
Encryption enabled

Default module: OC_DEFAULT_MODULE
Master key successfully enabled.Basic Configuration via the Web-UI
You can do basic configuration of encryption via the Web-UI, but it is recommended to use the CLI.
-
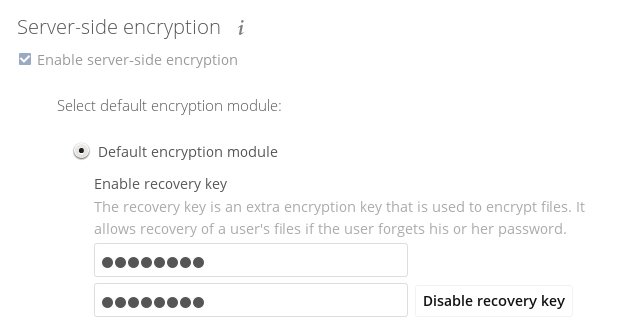
Go to , and enable Enable server-side encryption.
-
Select the "Default encryption module", either "Master Key" (recommended) or "User-key" (depreciated).
-
When User-specific encryption is enabled, users must log out and log back in to trigger the automatic personal encryption key generation process.
Master-Key-Based Encryption
Enabling Master Key Based Encryption from the Command-Line
To be safe and avoid any issues on a running instance, put your server in single user mode with the following command:
sudo -u www-data ./occ maintenance:singleuser --onEnabling encryption via the command line involves several commands. If not already done, enable the default encryption module app with the following command:
sudo -u www-data ./occ app:enable encryptionThen enable encryption, using the following command:
sudo -u www-data ./occ encryption:enableFinally, encrypt all data, using the following command:
sudo -u www-data ./occ encryption:encrypt-all --yes| This command is not typically required as the master key is often enabled at installation time. As a result when enabling it, there should be no data to encrypt. In case it’s being enabled after the installation and there are files which are unencrypted, encrypt-all can be used to encrypt them. Depending on the amount of existing data and the location, this operation can take a long time. |
Now you can turn off the single user mode:
sudo -u www-data ./occ maintenance:singleuser --offView Current Encryption Status
Get the current encryption status and the loaded encryption module:
sudo -u www-data ./occ encryption:statusReplacing an Existing Master Key
If the master key needs replacement, for example because it has been compromised, an occ command is available. The command is encryption:recreate-master-key. It replaces an existing master key with a new one and encrypts the files with the new key.
Decrypt Master-Key Encryption
You must first put your ownCloud server into single-user mode to prevent any user activity until encryption is completed.
sudo -u www-data ./occ maintenance:singleuser --onSingle user mode is currently enabledDecrypt all user data files, or optionally a single user:
sudo -u www-data ./occ encryption:decrypt-all [username]Disable Encryption
To disable encryption, put your ownCloud server into single-user mode, and then disable your encryption module with these commands:
sudo -u www-data ./occ maintenance:singleuser --onsudo -u www-data ./occ encryption:disableTake it out of single-user mode when you are finished, by using the following command:
sudo -u www-data ./occ maintenance:singleuser --off|
You may only disable encryption by using the occ Encryption Commands. Make sure you have backups of all encryption keys, including those for all your users if user key encryption was selected. |
View Current Encryption Status
Get the current encryption status and the loaded encryption module:
sudo -u www-data ./occ encryption:statusEnable Users' File Recovery Keys
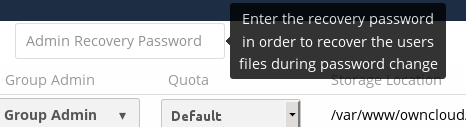
If users encrypt their files and lose their ownCloud password, they lose access to their encrypted files as the files will be unrecoverable. It is not possible to reset a user’s password using the standard reset process if the user’s files are encrypted.
In such a case, you’ll see a yellow banner warning:
Please provide an admin recovery password; otherwise, all user data will be lost.To avoid all this, create a Recovery Key. To do so, go to the Encryption section of your Admin page and set a recovery key password.
You then need to ask your users to opt-in to the Recovery Key. For the users to do this, they need to go to the Personal page and enable the recovery key. This grants the admin the right to decrypt their data for recovery purposes. If they do not do this, the Recovery Key won’t work for them.
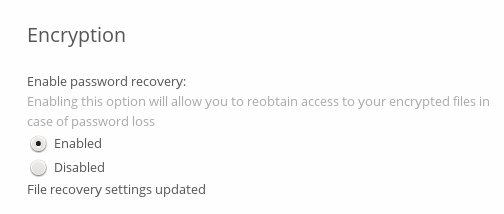
Users who have enabled password recovery you can provide with a new password and recovery access to their encrypted files by supplying the Recovery Key on their page.
You may change your recovery key password.
| Sharing a recovery key with a user group is not supported. This is only supported with the master key. |
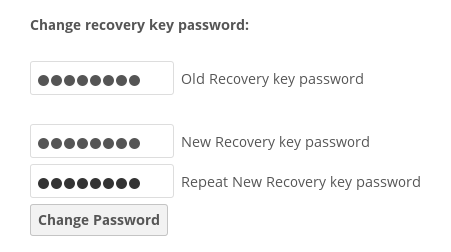
Changing the Recovery Key Password
If you have misplaced your recovery key password and need to replace it, here’s what you need to do:
-
Delete the recovery key from both
data/owncloud_private_keysanddata/public-keys. -
Edit your database table
oc_appconfigand remove the rows with the config keysrecoveryKeyIdandrecoveryAdminEnabledfor the appidfiles_encryption. -
Login as admin and activate the recovery key again with a new password. This will generate a new key pair.
-
All users who used the original recovery key will need to disable it and enable it again. This deletes the old recovery share keys from their files and encrypts their files with the new recovery key.
| You can only change the recovery key password if you know the original. This is by design as only admins who know the recovery key password should be able to change it. Otherwise admins could hijack the recovery key from each other. |
| Replacing the recovery key will mean that all users will lose the possibility to recover their files until they have applied the new recovery key. |
Decrypt User-Key Encryption
You must first put your ownCloud server into single-user mode to prevent any user activity until encryption is completed.
sudo -u www-data ./occ maintenance:singleuser --onSingle user mode is currently enabledDisable Encryption
You may disable encryption only with occ. Make sure you have backups of all the encryption keys, including those for all users. Next, put your ownCloud server into single-user mode, and then disable your encryption module with this command:
sudo -u www-data ./occ maintenance:singleuser --onsudo -u www-data ./occ encryption:disable| Encryption cannot be disabled without the user’s password or file recovery key. If you don’t have access to at least one of these then there is no way to decrypt all files. Then, take it out of single-user mode when you are finished with this command: |
sudo -u www-data ./occ maintenance:singleuser --offIt is possible to disable encryption with the file recovery key if every user has enabled it. In this case, "decrypt all" will decrypt all files of all users.
| It is not planned to move this to the next user login or a background job. If that was done, then login passwords would need to be stored in the database, which could be a security issue. |
Move Key Location
View current location of keys:
sudo -u www-data ./occ encryption:show-key-storage-rootCurrent key storage root: default storage location (data/)You can move the keys to another folder inside your data directory. Moving your keys outside of your data folder is not supported. The folder must already exist, be owned by and restricted to root and the webserver group. This example is for Ubuntu Linux. Note that the new folder is relative to your data directory:
mkdir /var/www/owncloud/data/new_keyschown -R root:www-data /var/www/owncloud/data/new_keyschmod -R 0770 /var/www/owncloud/data/new_keyssudo -u www-data ./occ encryption:change-key-storage-root new_keysChange key storage root from default storage location to new_keys
Start to move keys:
4 [============================]
Key storage root successfully changed to new_keysLDAP and Other External User Back-ends
If you use an external user back-end, such as an LDAP or Samba server, and you change a user’s password on that back-end, the user will be prompted to change their ownCloud login to match their next ownCloud login. The user will need both their old and new passwords to do this.
If you have enabled the recovery key, then you can change a user’s password in the ownCloud Users panel to match their back-end password, and then — of course — notify the user and give them their new password.
Encrypting External Mountpoints
You and your users can encrypt individual external mount points. You must have external storage enabled on your Admin page, and enabled for your users. Encryption settings can be configured in the mount options for an external storage mount; see Mount Options.
Sharing Encrypted Files
After encryption is enabled, your users must also log out and log back in to generate their personal encryption keys. They will see a yellow warning banner that says "Encryption App is enabled, but your keys are not initialized. Please log-out and log-in again."
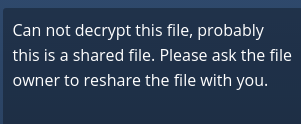
Also, share owners may need to re-share files after encryption is enabled. Users who are trying to access the share will see a message advising them to ask the share owner to re-share the file with them.
For individual shares, un-share and re-share the file. For group shares, share with any individuals who can’t access the share. This updates the encryption, and then the share owner can remove the individual shares.