Install Infinite Scale on a Server
- Introduction
- Requirements
- Accessing Infinite Scale
- Limitations
- Add the IP Address to the Domains
- Prepare the Server
- Download and Transfer the Example
- Extract the Example
- Edit the Configuration File
- Certificate Generation Process
- Start the Deployment
- Stop the Deployment
- Change Settings
- First Time Login
- Monitor the Instance
- Admin Password
- Volume Migration
- Updating
- Certificate Renewal
- Updating
Introduction
Install Infinite Scale using Docker Compose on a server for production use. The aim of this guide is to be up and running as fast as possible using a deployment setup that includes Infinite Scale and web office applications for document collaboration for home usage or small businesses. It also uses valid certificates from Letsencrypt.
| Some decisions and steps need to be taken in order when setting up and configuring the server. We therefore highly recommend reading the guide and not just trying to copy paste commands. |
| This guide references the latest 5.0.9 version of Infinite Scale. |
| With this setup, each deployment only contains one instance of Infinite Scale. |
Requirements
Hardware
This guide describes an installation of Infinite Scale based on Ubuntu LTS and docker compose. The underlying hardware of the server can be anything as listed below as long it meets the OS requirements defined in the Software Stack:
-
Raspberry Pi (4 and higher)
-
Bare Metal Server
-
Virtual Machine
-
…
|
Knowledge Stack
You, as administrator, must have the following minimum knowledge stack.
-
Being capable to order and configure external accessible domains.
-
Being capable to configure:
Router, Firewall, NAT, DHCP, networks etc. -
Command line (bash) tools like:
ssh, actions on files, edit files etc. -
Maintaining a server:
Setting or changing hostnames, IP configuration, installing software packages etc.
Software Stack
For the OS, Ubuntu LTS 24.04 has been selected, but it will also work with Ubuntu LTS 22.04. If you already have a server running Ubuntu LTS 24.04, you can use that one as long it meets the requirements listed below.
Note that this guide expects:
-
The prerequisite of a server with the installed OS is met and any required software other than Infinite Scale like docker and docker compose is installed and preconfigured and all the software is updated to the latest version.
-
You have at minimum shell access and you can reach your host via ssh from another computer in your network.
sudopermissions may be required in some steps later in the setup.
Volumes
Volumes are the location where docker stores data. In a nutshell, docker can handle two types of volumes:
-
Volumes managed by docker:
These volumes are managed by docker and are located, if not otherwise defined, in the same partition where the OS is installed. While this is easy to handle and does not need extra configuration, you have dependencies that should be considered like sharing space, snapshotting, resetting, backup/restore, migration etc. -
External volumes:
These volumes are not managed by docker. You need to provide docker a mount point for the volume which can be a folder, partition, external storage etc.
Note that the term volume can be used in different contexts. For example, Hetzner uses the term volume for a definable disk space that is independently provisioned and charged. Such a volume can then be connected to a docker volume to store data.
Other Requirements
- Firewall
-
Because the server configured is exposed to the internet, we highly recommend configuring a firewall for security reasons. Configuring a firewall is not part of this document.
The minimum configuration for the firewall is to allow TCP port 22, 80 and 443. We also recommend to allow ICMPto be able to ping the server. - Domain Name and Routing
-
To access Infinite Scale from the internet, you must:
-
Own a domain name which will get multiple subdomains configured.
-
You can also use a wildcard operator for the subdomains in the DNS configuration. In cases where you already use subdomains for other purposes, we recommend using a subdomain as entry point and add the wildcard operator there to allow different IP configurations.
-
-
The IP address of your WAN needs to be used for the (sub)domains configured.
Note that you can use any domain provider of choice.
-
The following data needs to be available to configure the Infinite Scale eMail setup, see the notifications service for more details.
|
-
SMTP_HOST
SMTP host to connect to. -
SMTP_PORT
Port of the SMTP host to connect to. -
SMTP_SENDER
An eMail address that is used for sending Infinite Scale notification eMails like
ocis <noreply@yourdomain.com>. -
SMTP_USERNAME
Username for the SMTP host to connect to. -
SMTP_PASSWORD
Password for the SMTP host to connect to. -
SMTP_AUTHENTICATION
Authentication method for the SMTP communication. -
SMTP_SECURITY
Define using secure or insecure connections to the SMTP server.
Domain Names
This environment requires that multiple (sub)domain names are available. You have to deviate from the examples according to your environment. The (sub)domains must be configured to point to the server you configured. The same is true when using a wildcard configuration. For a wildcard setup on the DNS, three (sub)domains must be provided to configure the .env file described in one of the next sections.
The following (sub)domains are required at minimum, an example is printed for each, replace them according to your environment:
-
OCIS_DOMAIN
ocis.yourdomain.com -
COLLABORA_DOMAIN
collabora.yourdomain.com -
WOPISERVER_DOMAIN
wopiserver.yourdomain.com
Accessing Infinite Scale
Infinite Scale can be accessed from the internet and from your local network via a browser using the URL defined in OCIS_DOMAIN:

Limitations
- Data Location
-
If not otherwise setup and configured, all data is stored in volumes managed by docker in the same partition of the server. If you want to define your own volume paths, provide the paths and configure them in the
.envfile accordingly. This is highly recommended for production environments and described in the Hardware and Volumes sections above. - User and User Access Management
-
The following embedded services are well suited for home use and smaller businesses though Infinite Scale can be configured to use external products which is relevant for bigger installations and not covered here.
-
Infinite Scale has an embedded identity management (IDM [1]) which takes care of creating, storing, and managing user identity information.
-
In addition, it also has an embedded identity provider (IDP [2]) to track and manage user identities, as well as the permissions and access levels associated with those identities.
-
Add the IP Address to the Domains
After the server has been finally setup, you must use the IP address assigned to your WAN to configure DNS mapping at your DNS provider accordingly. If you have allowed ICMP requests in the firewall settings, you can then ping your server with one of the domain names defined.
Prepare the Server
As a standard regular task, you need to update packages, especially after first server login. Open a shell on the server and issue the following command:
apt-get update && apt-get upgradeInstall Required Software Packages
Note that we do not recommend using the Ubuntu embedded Docker installations but install and upgrade them manually to get the latest releases.
- Docker Engine
-
Follow this guide to install
docker: Install using the apt repository. - Docker Compose
-
Follow this guide to install
docker compose: Install the Compose plugin. - unzip
-
The package
unzipmay not be present. In case install with:apt install unzip
Download and Transfer the Example
The client to download the example is not the server you upload to. The server does not have a graphical interface (GUI) and therefore no browser. The example commands below are based on a Linux client. If you are using macOS or Windows, the commands need to be adapted accordingly. This mainly effects the location the browser downloads to (~/Downloads).
|
The client from where you download the example via a browser and upload it using scp must have granted access to the server and have the scp app installed.
|
To download and extract the necessary deployment example [3], open a browser and enter the following URL:
The .zip file will be downloaded into your local Download directory.
Transfer the .zip file created to the server by issuing the following command, replace root@182.83.2.94 with the username and address of the server according your setup:
scp ~/Downloads/'owncloud ocis v5.0.9 deployments-examples_ocis_wopi.zip' root@182.83.2.94:/optNote that the command differs a bit on Windows due to way how the home directory and the path separator is defined.
With the next step, if you have already unzipped that file before or if you intend to update an existing extract with a new compose version downloaded, the .env file will get overwritten without notice and you need to reconfigure this deployment!
|
Extract the Example
Login into the server and:
-
Create a subdirectory to save all compose files and folders.
mkdir -p /opt/compose/ocis/ocis_wopi -
Extract the zip file into the directory by issuing the following command:
unzip -d /opt/compose/ocis/ocis_wopi \ /opt/'owncloud ocis v5.0.9 deployments-examples_ocis_wopi.zip' -
When files have been extracted, list the directory with:
ls -la /opt/compose/ocis/ocis_wopi/The listing should contain files and folders like the following:
config
docker-compose.yml
.env
README.md
collabora.yml
companion.yml
...
Edit the Configuration File
Change into the /opt/compose/ocis/ocis_wopi directory and open the .env file with an editor.
Only a few settings need to be configured:
-
INSECURE
Comment this line because we are on an internet facing server. -
TRAEFIK_ACME_MAIL
Add a valid response eMail address for Letsencrypt, see the note below. -
TRAEFIK_ACME_CASERVER
Set the CAServer to staging, see the note below. -
OCIS_DOMAIN,COLLABORA_DOMAINandWOPISERVER_DOMAIN
Set the domain names as defined in Domain Names. -
OCIS_CONFIG_DIRandOCIS_DATA_DIR
If you expect a higher amount of data in the instance, consider using own paths instead of using docker internal volumes. -
SMTP_xxx
Define these settings according to your eMail configuration. With the settings defined, Infinite Scale is able to send notifications to users. If the settings are not defined, Infinite Scale will start, but notifications can’t be sent.
| When not defining your own domain names, internal evaluation only domain names with self-signed certificates are used automatically. |
| Additional options can be configured like web apps. These should be configured after successfully starting the deployment without issues. This eases finding any first startup issues that need to be solved first. |
When the configuration is completed, you can optionally print the final assembled docker compose yml setup before starting it by using the following command. This output helps finding configuration issues more easily.
docker compose configCertificate Generation Process
The recommended process to generate live certificates is the following:
-
First, let LetsEncrypt generate "fake" certificates. These certifcates show that the process works but they cant be used in production. To do so, the environment variable
TRAEFIK_ACME_CASERVERneeds to be set to LetsEncrypt’s Staging Environment, see the.envfile for the value to be set. By doing so, any restart after fixing issues will not count against the rate limit of LetsEncrypt. -
The
TRAEFIK_ACME_MAILmust be set to a valid eMail address you own. When certificate issuing is triggered, LetsEncrypt checks in the request for creating valid certificates, if the response eMail address is valid and continues if so. If not, it logs an error and self-signed certificates are being used, see see Solving First Startup Issues. -
Then, if any issues occur, you need to Stop the Deployment and fix them before continuing with the next step. See Solving First Startup Issues for a list of common issues,
-
Finally, if there are no (more) issues which you can identify because
Fake LE intermediate X1certificates have been generated (check the certificate issuer in the browser, Google for how to do so), you must delete thecert-volumeand set back theTRAEFIK_ACME_CASERVERenvironment variable to empty and startup the instance as described below.
Start the Deployment
When you have finished the configuration, you can start the deployment by issuing the following command:
docker compose up -dThis command will download all necessary containers and starts up the instance according your settings in the background (flag -d).
- Check the logs
-
See Monitor the Instance for more details on logging.
-
First check the traefik logs for certificate issues, then other logs. See Solving First Startup Issues for more details.
If no issues are logged, traefik and LetsEncrypt were able to handle connectivity and domains.
In case you have used staging certificates as suggested above,
-
and start the deployment as described above.
When done, recheck the traefik logs and when all is fine, you can access your instance, see First Time Login.
Solving First Startup Issues
Note, see Monitor the Instance for more details on logging.
If any issues are logged by traefik on first startup with respect to LetsEncrypt like:
- Common issues
-
-
…Contact emails @example.org are forbidden:
The environment variableTRAEFIK_ACME_MAILneeds to be set to a valid eMail address you own. -
…unable to generate a certificate for the domains…,acme: error: 400andacme-challenge:
Check if the TCP ports 80/443 are open in the firewall configured. You can run a test during running compose to test if traefik can be reached on those ports. To do so visit Let’s Debug. -
…DNS problem: NXDOMAIN looking up A for…
This points to a DNS resolution problem. Check if the domains entered in the DNS and in the.envfile match. Note that when using wildcard domains on the DNS, the fixed part must match on both sides.
For any issue fixed, before you bring up the instance again, some steps need to be taken. This is because the certificate volume now holds invalid data:
-
- Post fixing the issue
-
The following actions need to be taken before starting the deployment again:
Shut down the deploymentdocker compose downNote, do not use the
-voption as it will delete ALL volumes.List the docker volumesdocker volume lsDelete the docker certs volumedocker volume rm ocis_wopi_certs
Stop the Deployment
Stopping the deployment is easy, just issue:
docker compose down --remove-orphansFor safety reasons, do not add the -v (volumes) flag to the command as that would delete all volumes including their data. If deleting volumes is necessary, deleting them selectively is the preferred method, see the section above for an example. See the docker compose down options for more details.
Change Settings
To change settings via the .env file, the deployment must be in the down state. See the section above for how to do so.
First Time Login
Now, after preparations have finished, you can access your instance from any client. To do so, open your browser and enter the instance URL as you have defined it:
ocis.yourdomain.comWhich will show the following screen:
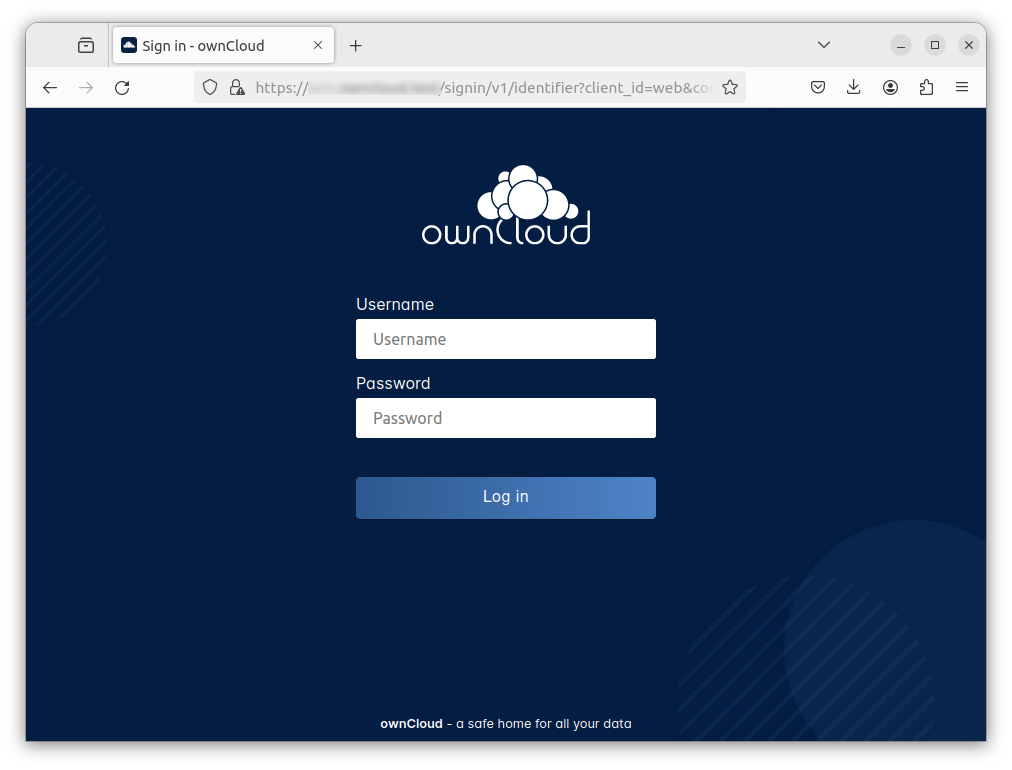
For the credentials, use:
-
adminas user and -
adminfor the password,
or the one you have defined manually during setup.
If you have defined an initial password via the .env file manually but forgot it, you need to follow one of the procedures described in the Admin Password section.
|
If you have logged in successfully, you should see the following screen:
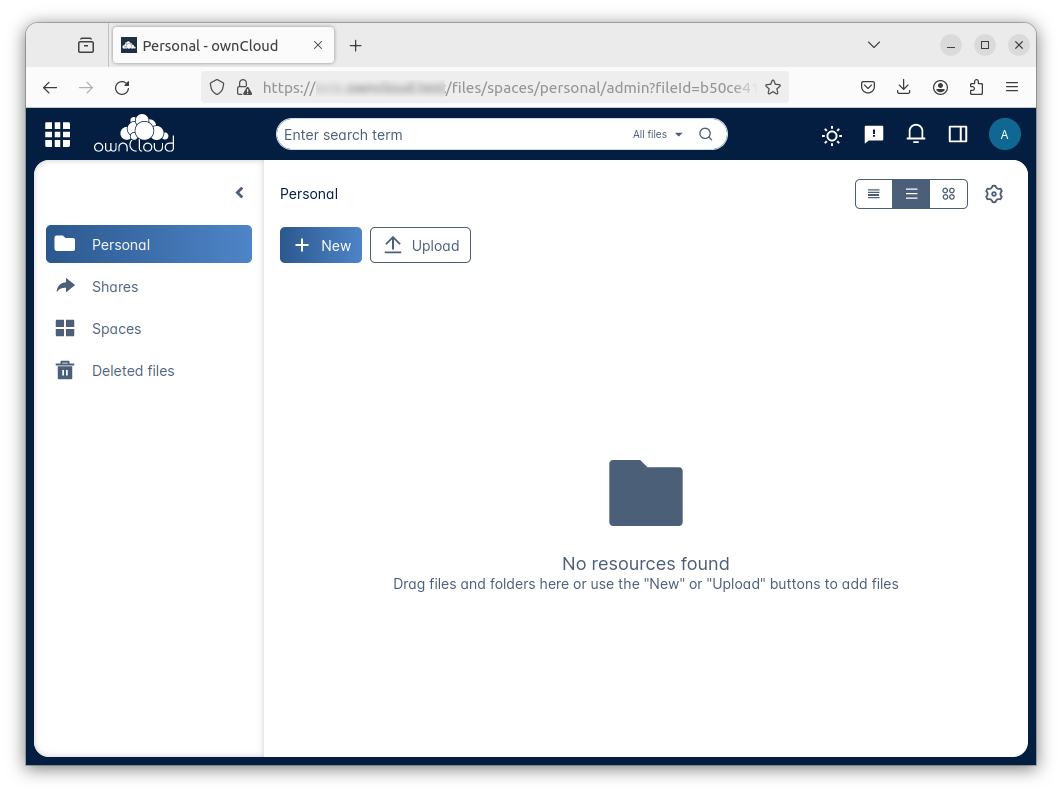
Congratulations, you have successfully setup Infinite Scale with Web Office.
| Checkout the Desktop App or Mobile Apps to sync files to/from clients. |
| The Infinite Scale deployment will reboot automatically on a server reboot if the compose environment is not shut down by command. |
Among other topics described below, some basic monitoring commands are provided.
Monitor the Instance
Container
To get the state and the Container ID, issue one of the following commands:
docker ps -a/opt/compose/ocis/ocis_wopi:docker compose ps -a --format "table {{.Service}}\t{{.State}}\t{{.ID}}"Admin Password
Initial Admin Password from Docker Log
If the manually set initial admin password has been forgotten before it got changed, you can get it from the docker log. See the View container logs for more details on docker logging.
First you need to get the Infinite Scale CONTAINER ID:
docker compose ps -a --format "table {{.Service}}\t{{.State}}\t{{.ID}}"From the output, see an example below, note the container ID that matches ocis:
SERVICE         STATE     CONTAINER ID
collabora       running   a7f74dfbbec3
collaboration   running   ed4d086ddd06
ocis            running   b395d936c23a
tika            running   08ae7b0c9c0e
traefik         running   5f0e1d03bcbf
Use the container ID identified in the following command to read the Infinite Scale logs to get the initial admin password created, replace <CONTAINER ID> accordingly:
docker logs <CONTAINER ID> 2>&1 | lessThe output prints the log from the beginning. As first entry, the initial admin password set during first startup is shown. You can scroll thru the log using the keyboard, see the less description for more details.
If no password can be identified, you must reset the admin password via the command line as described below.
Command Line Password Reset
To change the admin password from the command line, which you can do at any time, follow the guide described in Password Reset for the Admin User.
Volume Migration
This section gives some guidance if you want to migrate the Infinite Scale docker internal volumes to docker volumes using a local path. For example, this can be required to separate the container from its data or if a high data volume is expected. See additional documentation in the Start a Service After a Resource is Mounted if you want to use network mounts like NFS or iSCSI for the data directory.
-
Prepare two directories which will provide the mount point for Infinite Scale
dataandconfig.
The example will use the local path/mnt/dataandmnt/config, adapt according your environment. -
For the following steps, the deployment must be in the
upstate, the containers must provide a container ID for copying.-
Stop the running instance. By doing so, the instance gets stopped but containers are not removed compared to when downing it:
docker compose stop -
Get the
ociscontainer ID using one of the maintenance - Container commands. -
Copy both the content of the docker internal
ocis-configandocis-datavolume to their new local location by issuing the following commands, replace<CONTAINER ID>accordingly:docker cp <CONTAINER ID>:/etc/ocis/. /mnt/config docker cp <CONTAINER ID>:/var/lib/ocis/. /mnt/data -
Change the ownership of the new source folders recursively. This step is very important because the user inside the container is
1000and will mostly not match the user who copied the folders:chown -R 1000:1000 /mnt/config /mnt/data
-
-
Down the compose instance by issuing:
docker compose down-
In the
.envfile, set the paths:OCIS_DATA_DIR=/mnt/data OCIS_CONFIG_DIR=/mnt/config
-
-
Bring the compose environment
upwith:docker compose up-
If the containers come up without reporting issues, you have successfully moved your Infinite Scale docker internal volumes to local paths.
-
-
Finally, you can remove the docker internal volumes for
configanddata:docker volume ls docker volume rm ocis_wopi_ocis-config ocis_wopi_ocis-data
Updating
Note that this deploymment can currently only be updated within Infinite Scale v5.
If a new Infinite Scale v5 version is available, just down the compose environment and bring it back up. Containers will update automatically and you can continue using Infinite Scale as usual.
Certificate Renewal
There is nothing special to do renewing certificates issued. Traefik takes care of the renewal process automatically. In case of a renewal issue, just restart the compose environment as Traefik checks certificate expiry on startup.
Updating
Note that this deploymment can only be updated within Infinite Scale v5.
If a new Infinite Scale v5 version is available, you must stop the compose environment with docker compose down, pull the new image with docker compose pull and start the compose environment with docker compose up -d again. You can use the latest tag in the OCIS_DOCKER_TAG variable as it will automatically point to the latest available production release.